Ensure the surface is thoroughly cleaned prior to applying your sticker, dust or grease will prevent a proper adhesion. If applying to glass, paint or plastics, we recommend the use of a high alcohol based cleaner, but always wash with water afterwards. Also glasscleaner will leave a layer that will prevent the glue to fix properly. Minimum temperature of 12 degrees is important. Glue will fix until 48h after applying
Oppervlakte goed schoonmaken met (alcoholbasis) ontvetter en daarna naspoelen met water voor het droogmaken. Glasreinigers en andere producten laten juist een laag achter en voorkomen dat de lijm kan (tot 48u) hechten. Werk in een omgeving van min 12 graden.
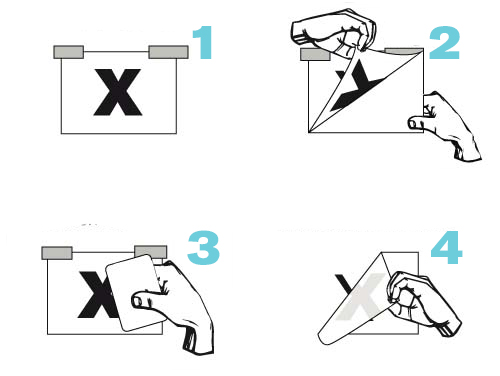
1. Your die-cut sticker is made up of three layers – A backing tape, which is the first part of the sticker to be removed, the sticker itself, and an application tape layer, which will be removed last. Position the sticker first on the surface, using papertape and rub with a squeegee.
1. Een gesneden (geplotte) sticker bestaat uit 3 lagen, de ondergrond, de sticker zelf en de applicatie tape. Begin met de sticker op de juiste plek aan te brengen met papiertape en goed aan te wrijven met een rakel of bijv. een bankpas.
2. To apply your sticker, flip it over, separate a corner, hold the application tape down, and peel the backing paper back against itself and remove it. The sticker should remain on the application tape. If they lift, put the backing paper back down and rub the sticker with a squeegee again to fix the adhesion.
2. Haal de papieren ondergrond voorzichtig los van de applicatiefolie, zodat de sticker volledig achterblijft op deze papiertape. Verwijder de papieren ondergrond. Blijft de sticker niet volledig op de papiertape zitten, even terug op de ondergrond plakken en wederom goed aanwrijven.
3. Apply the sticker where you want it placed. Use the bottom of the text or design as a level for alignment. Start with one end, tack the end down and swipe accross. Rub firmly with a squeegee to fix it and to avoid air bubbles.
3. Plak de sticker op de gewenste plek en wrijf goed aan met een rakel om luchtbellen te voorkomen. Laat daarna de sticker voor een aantal minuten al hechten. Opgelet: het kan zelfs tot 48u duren voor de lijm echt goed gehecht is !
4. Slowly remove the application tape, pull the layer back against itself, ensuring the letters have adhered to the surface. If the sticker lift, lay the application tape layer back down and add more pressure where needed. All that should remain is the sticker itself. Throw away the backing papier and application tape
4. Haal de applicatie voorzichtig los vanaf een hoek en let goed op of de sticker blijft plakken op de ondergrond. Indien niet, even terug aanwrijven voor een betere hechting.